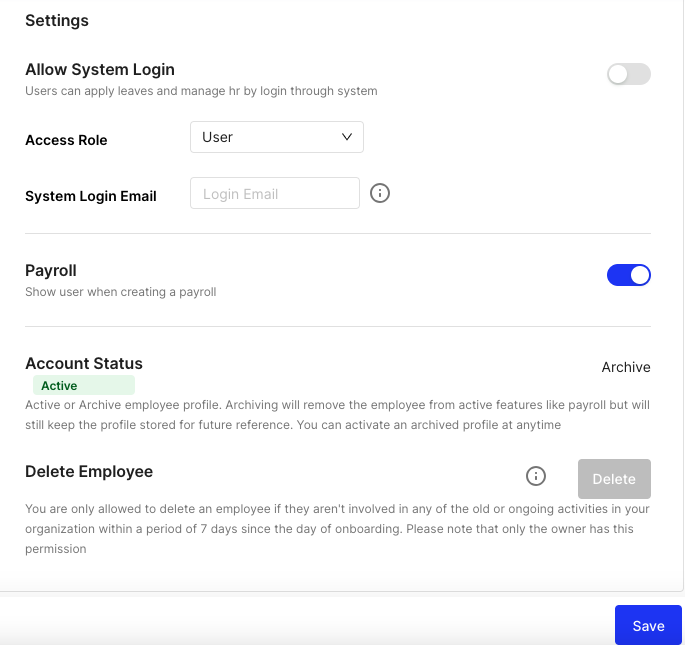
Update employee settings
Updated May 23, 2026 · 2 min read · Reviewed by The Payroll Success Team at Humanised
This article is for Owners and admins who use Humanised
Overview
-
Manage and update employee settings ensuring accurate data for a smooth payroll process.
To ensure a smooth payroll experience and optimize all functionalities within Humanised Payroll HR system, prioritize accurate employee settings.
Step 1: Open the employee profile
-
Go to the contact section from the left-hand navigation panel and you will find a list of all the employees/ employee profiles. You can utilize the search bar as well if you need to find a specific employee profile quickly.
-
Click on the relevant employee’s name to open the employee’s profile.
Step 2: Update settings
-
Open “settings” from the sub sections from the left side.
-
Then update the followings:

System login access:
- Turn on “Allow System Login” if you want the employee to access the system. This might be useful for employees who need to manage their own payroll information or timesheets.
- Leave it off if the employee doesn’t need to log in.
Access role:
Choose the employee’s access level from the “Access Role” menu. This determines what information they can see and edit within the system.
System login mail:
Update this with the email address the employee will use to log in. The system will send a password reset email to this address.
Include in payroll:
- This section lets you control whether the employee is included in upcoming payroll processing.
- Turn on “Payrun” if the employee needs to be shown during the next payrun.
- Leave it off if the employee doesn’t need to be included in the upcoming payroll (for example, a new hire who hasn’t started working yet)
Archive an employee:
- Archiving an employee profile removes them from your active view. All associated data remains secure and readily accessible within the system. This can be used for resigned employees.
- Go to the “Account Status” section and click on “Archive”. Clicking this will open a confirmation prompt.
- To finalize the archiving process, confirm your choice by clicking “Yes, Archive”.
Step 3: Save changes
-
Once you’ve completed your updates, click on the “Save” button to finalize the changes within the employee profile.
What’s next?:
Was this article helpful?
Your feedback helps us improve these guides.
Keep reading
More guides in Contacts.
- Onboard a new employee by email in HumanisedSend a self-service onboarding invite, let the employee fill in their own details, then review and approve. The…→
- Delete an employee profileIf an employee profile is no longer needed for payroll or system purposes, you have the option to…→
- How to give accessHumanised Payroll system empowers administrators with the ability to assign user roles and permissions. This ensures appropriate access…→
Still need a hand?
A real human on our team will look at your ticket and come back to you — typically within a few working hours.
Open a support ticket